Saturday, February 27, 2010

Homemade Yoghurt (based on malaysian climate)


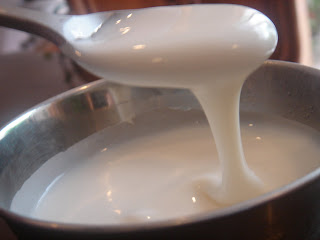
This recipe yields really creamy yoghurt (almost like greek yoghurt) and with no added sugar and less sour.


Ingredients:
1 litre full cream milk 
3-4 tbsp plain yogurt 
(optional but recommended 3-5 tbsp full cream milk powder depending on the quality of full cream milk)

1. Mix 4-5 tbsp of the milk with yogurt in a cup and set aside at room temperature.
2. Meanwhile, bring full cream milk to near boil, stirring constantly (little bubbles forming at the side of the pot)
3. Turn off heat and pour milk on a pyrex ware or glassware and leave uncovered until a thin layer forms on the surface or until luke warm.
4. pour in the yoghurt mixture from the sides , evenly (try not to touch the surface too much)
5. Cover the glassbowl with cling wrap and place the entire bowl on top of the fridge for about 10 hours (based on local climate)
6. Its ok if after 10 hours, it still  looks still slightly or yet to set.
7. Carefully, scoop off the excess liquid formed at the sides or on the surface without breaking the surface.
8. or skip step 7 and refrigerate it covered overnight.
9.  Once set, scoop it into a container and leave it in the fridge until needed. 
10. Use the remaining 3-4 tbsp yoghurt to make a new batch of fresh yoghurt.

(Note : at 8 hours, it may be less firm and less sour, at 10 hours it has the right level of sourness- to my taste, and at 12 hours its more firm and curdled up, liquid separates from main curd and more sour)
Deefried 'You Tiao' / Char Kueh/ Chinese Crullers


300 gm high protein flour
2 tsp salt
1/2 tsp alum
1/2 tsp amonia
1/2 tsp baking soda
1 tsp baking powder
1/2 tsp limestone powder (Sek Gou)
190-200 ml water
1.5 tsp sugar
1.5 tsp yeast
2 tbsp lukewarm water

1. Mix water (190 ml) with alum, salt, amonia, baking soda and limestone powder. Set aside
2. Meanwhile, mix sugar, yeast and 2 tbsp water and set aside until frothy.
3. In a stainless steel bowl. Pour in high protein flour.
4. Gently pour in the water mixture bit by bit, mixing it with your hands. And pour in the yeast mixture. Mix well.
5. The dough may look slightly moist (not watery) and sticks to the hand, which is okay.  Mix well and set aside covered for 10 min.
6. The following kneading method must be used if you don't want to have a doughnut instead.
- Gently apply pressure with your fist(slightly pulling it outwards) to the sides of the round  dough. Place your palm (upwards) underneath one of the corners to lift up (and pull) some dough and fold it over to the centre until all sides have been folded. Turn it over and repeat.
 - rest dough for a further 5 minute and repeat the process. for 4-5 times.
- Cover dough with a oiled baking sheet and allow to rise for 2-3 hours.

7. Divide portions into 3. 
8. Use one portion and gently roll it out into a rectangle shaped flat dough (on floured surface)
9. Let it rest while you do the same for the other 2 portions.
10. come back to the 1st portion, gently pull (from centre to the ends) of the rectangular dough to even it out.  This helps stretch the gluten thinner and tighter so that the outer skin becomes thinner.  
10.  Use a pastry cutter and cut into about 1 inch thick short pieces. Carefully (try not to stretch) place one sheet onto another and using a floured skewer, press the centre of the dough to stick them together (NOTE : DO NOT PROCEED WITH THIS STEP UNTIL YOU'RE READY TO FRY IT).
11. Hold the ends of the dough and stretch it slightly so that its length more than doubled and carefully lower it into the hot oil.
12. MUST DO : Immediately (before the shape hardens) use a wooden chopstick to toss /swirl/turn the dough stick from left to  right. (you will see big air pockets starting to form.  If you do not do this, you'll end up with a crispy but compact/dense doughnut).
Fry until golden brown and drain off excess oil.

Note: It is essential to place two sheets together and mark it with a skewer.  As you fry it. The gluten from one dough stretches the other to form a thinner layer of crispy skin. However, the layered sheets should not be left unattended for too long and it will eventually form into one single dough, thus defeating the purpose of doing so. 

If you can't finish the entire batch, just deepfry it until the shape sets and freeze it until you need it.  Deepfry it straight off the fridge until golden brown and crispy.

Most recipes out there are pretty standard.  But they don't teach u how to handle the dough, which is very important or it will never look like a 'you tiao'.

Tau Foo Fah (Sweet Soya bean curds)


Ingredients : (makes about 6 - 8 bowls)
300 gm soy beans (soaked for at least half a day)
2 tsp "Sek Kou"/limestone powder
1.5 tbsp cornstarch (Must)
1.2-1.5 ltr water

Method:
1. After soaking the beans for at least 1/2 day, discard the water. Divide beans into three portions.
2. Place 1/3 of beans into a blender and add 1/3 of the water into the blender and blend to a count of 5 seconds. Repeat for another 2 times. (Be careful not to blend too long or the soy milk will turn out slimy.
3. Pour it out into a large basin/container.
4. Repeat the process for the remaining beans.
5. Use a coffee strainer (those traditional cloth ones), pour in a ladle or two of the blended beans mixture and squeeze out the milk/liquid into large pot. (Don't add additional water !!)
6. Bring soy milk to boil (when it starts to bubble, keep a watch over the stove so that it won't spill over)
7. Meanwhile, in another pot, put in the cornstarch and "Sek Kou" and dilute with 3 -4 tbsp of water.
8. "Flush" in the hot soy milk into the pot of flour mixture and leave it untouched until the curd is firm (about 5-10 minutes...)
9. The sugar syrup (depending on how sweet you want it to be) consist of sugar (cane or normal sugar or some like to have gula melaka) melted in water and pandan leave. The syrup should be sweeter so that once added into the beancurd, will be just nice and not bland.
10. Scoop up the beancurd layer by layer (occasionally discarding the liquid released) into the serving bowl and add in desired amount of syrup. Eat while its hot.

You may also add in 1-2 slices of ginger when u cook the syrup.  

Saturday, February 20, 2010

Basic Egg-Coconut Agar agar


Ingredients:

3 packets agar-agar (17gm each)
2 blocks gula melaka (total 500gm), melted, strained
2 nos of desicated coconut santan
800 ml water
3 eggs
5-6 nos (large pandan leave)
3 ltr water (additional)
a pinch of salt
12 tbsp coarse sugar

1. Bring 3 ltr water to boil. Add in agar -agar and pandan leaves
2. Meanwhile, mix coconut santan with 800 ml water. Knead and squeeze for a minute or so.
3. Gently squeeze out milk through strainer. Mix milk with 3 beaten eggs and a pinch of salt
4. Once the agar -agar dissolves (depending on the grade of agar agar), remove leaves and skim the surface.
5. Add in the sugar.
6. Pour in the coconut milk mixture and allow to heat until bubbles forms at the side (do not boil until it foams)
7. Pour into (equal) 2 trays measuring 8 inch by 13 inch tray (about 2inch thick) and allow to set
at room temperature before transfering into a chiller.

Some agar agar are in powder form and yields different texture. You may have to adjust the amount of liquid.

Chilled Sweet Beancurd-Water Chestnut & Sweetcorn Soup


I had a similar dessert in a restaurant in JB. Didn't know how they did it but this version is equally enjoyable and adding ginko makes it more enjoyable. Using beancurd gives it that smooth, 'slurpy' texture compared to soy bean milk or "fu chuk"/dried beancurd sheets.

Ingredients: (makes a large pot of soup)
2 can creamed sweetcorn
150 gm gingko
150 gm water chestnut, finely diced
2 blocks fresh soft beancurd (about 400 gm)
1.5-2 ltr water (depending on how wat consistency you want it to be)
20-30 tbsp sugar (or to taste)

Method:
1. Mix sweetcorn, ginko, water chestnuts, water and sugar. Bring to boil and let it simmmer for 15 minutes or so. Let it cool down.

2. Prior to serving, blend beancurds with a little bit of water) until mashed. (Briefly blance beancurd in boiling water before this step)

3. Pour into the sweetcorn mixture. Add in some ice and eat it cold.
Note: Next time will use "Tau Fu Fah" instead of soft beancurd to see if it yields better results.

Simple Carrot Cake


I got this recipe from someone but made some modification to suite my taste (less sugar and oil)


NOTE : 1 cup means 330 ml drinking mugs not 250ml ones.

1 cup of fine brown sugar
1 1/2 cup walnuts, roasted and roughly chopped
3 large eggs
1 tsp cinnamon
1 tsp baking powder
1 tsp baking soda
3/4 vegetable oil
1 1/2 cup self raising flour (or plain flour with 1/2 tsp more baking powder)
1/2 tsp salt
2 cups grated carrots (gently squeeze out part of the juice from the grated carrots)

Method :
1. In a cake mixer, beat sugar and oil for about 2 minutes. Add in eggs one by one and continue mixing until sugar dissolves.
2. Mix flour with baking soda, baking powder, baking soda, salt cinnamon.
3. Sieve flour into the sugar mixture and fold the flour in evenly.
4. Fold in carrots and nuts.
5. pour into a oiled and floured baking pan and bake in moderately slow oven for about 45-50 minutes.
Note : I chose to squeeze out PART of the carrot juice so that the cake will be more fluffy and not soggy. I also preferred using baking powder despite using self raising flour for the same reason (after many testings). My oven has a scale of ten. Moderately slow oven means heat scale at 3.5. Use a toothpick to test whether the cake is done by poking right into the centre of the cake. If the toothpick comes out dry, then the cake is cooked. Sugar and Eggs gives a nice golden brown color to the cake.